

The OWASP Zed Attack Proxy (ZAP) is one of the world’s most popular open-source security tools, actively maintained by the Open Web Application Security Project (OWASP). It is designed to help developers and security professionals find security vulnerabilities in web applications during the development and testing phases. ZAP provides automated scanners as well as a set of tools that allow you to find security vulnerabilities manually.
Key Features:
- Automated Scanning: Detects a wide range of security vulnerabilities automatically.
- Intercepting Proxy: Allows inspection and modification of HTTP/HTTPS traffic between the browser and web application.
- Spider: Crawls the web application to discover its structure and content.
- Fuzzer: Tests inputs with various payloads to uncover hidden vulnerabilities.
- Plug-n-Hack: Integrates security tools with modern browsers.
Installing OWASP ZAP
1. Download OWASP ZAP:
- Navigate to the official OWASP ZAP download page
- Choose the appropriate version for your operating system (Windows, macOS, or Linux).
- Download and run the installer.

2. Installation Steps:
- Follow the installation instructions, accepting the license agreement and choosing the installation directory.
- After installation, launch OWASP ZAP.

3. First Launch Configuration:
- Upon first launch, you can choose to persist the ZAP session, which is useful for saving your scan progress and results.
- Configure local proxy settings, typically set to localhost:8080.
Setting Up OWASP ZAP for Development
- Configuring ZAP:
- Open OWASP ZAP.
- Go to the “Options” menu (gear icon) to configure essential settings such as local proxy, authentication methods, and user configurations.
- Integrating ZAP with Development Tools:
- Web Browser Integration:
- Configure your browser to use ZAP as a proxy. For example, in Chrome:
- Go to Settings > Advanced > System > Open proxy settings.
- Set the HTTP proxy to localhost and the port to 8080.
- Alternatively, you can simplify managing your routing rules by configuring SwitchyOmega with a proxy.
- Configure your browser to use ZAP as a proxy. For example, in Chrome:
- Web Browser Integration:
- Installing Necessary Add-ons:
- Enhance ZAP’s functionality by installing add-ons. Go to the Marketplace tab and install useful add-ons like “Advanced Scan,” “Active Scan Rules,” and more.
Developing Passive Scans with Selenium Java
- Setting Up Selenium:
- Create a Maven Project:
- Open your IDE (e.g., IntelliJ IDEA, Eclipse) and create a new Maven project.
- Specify the project name and location.
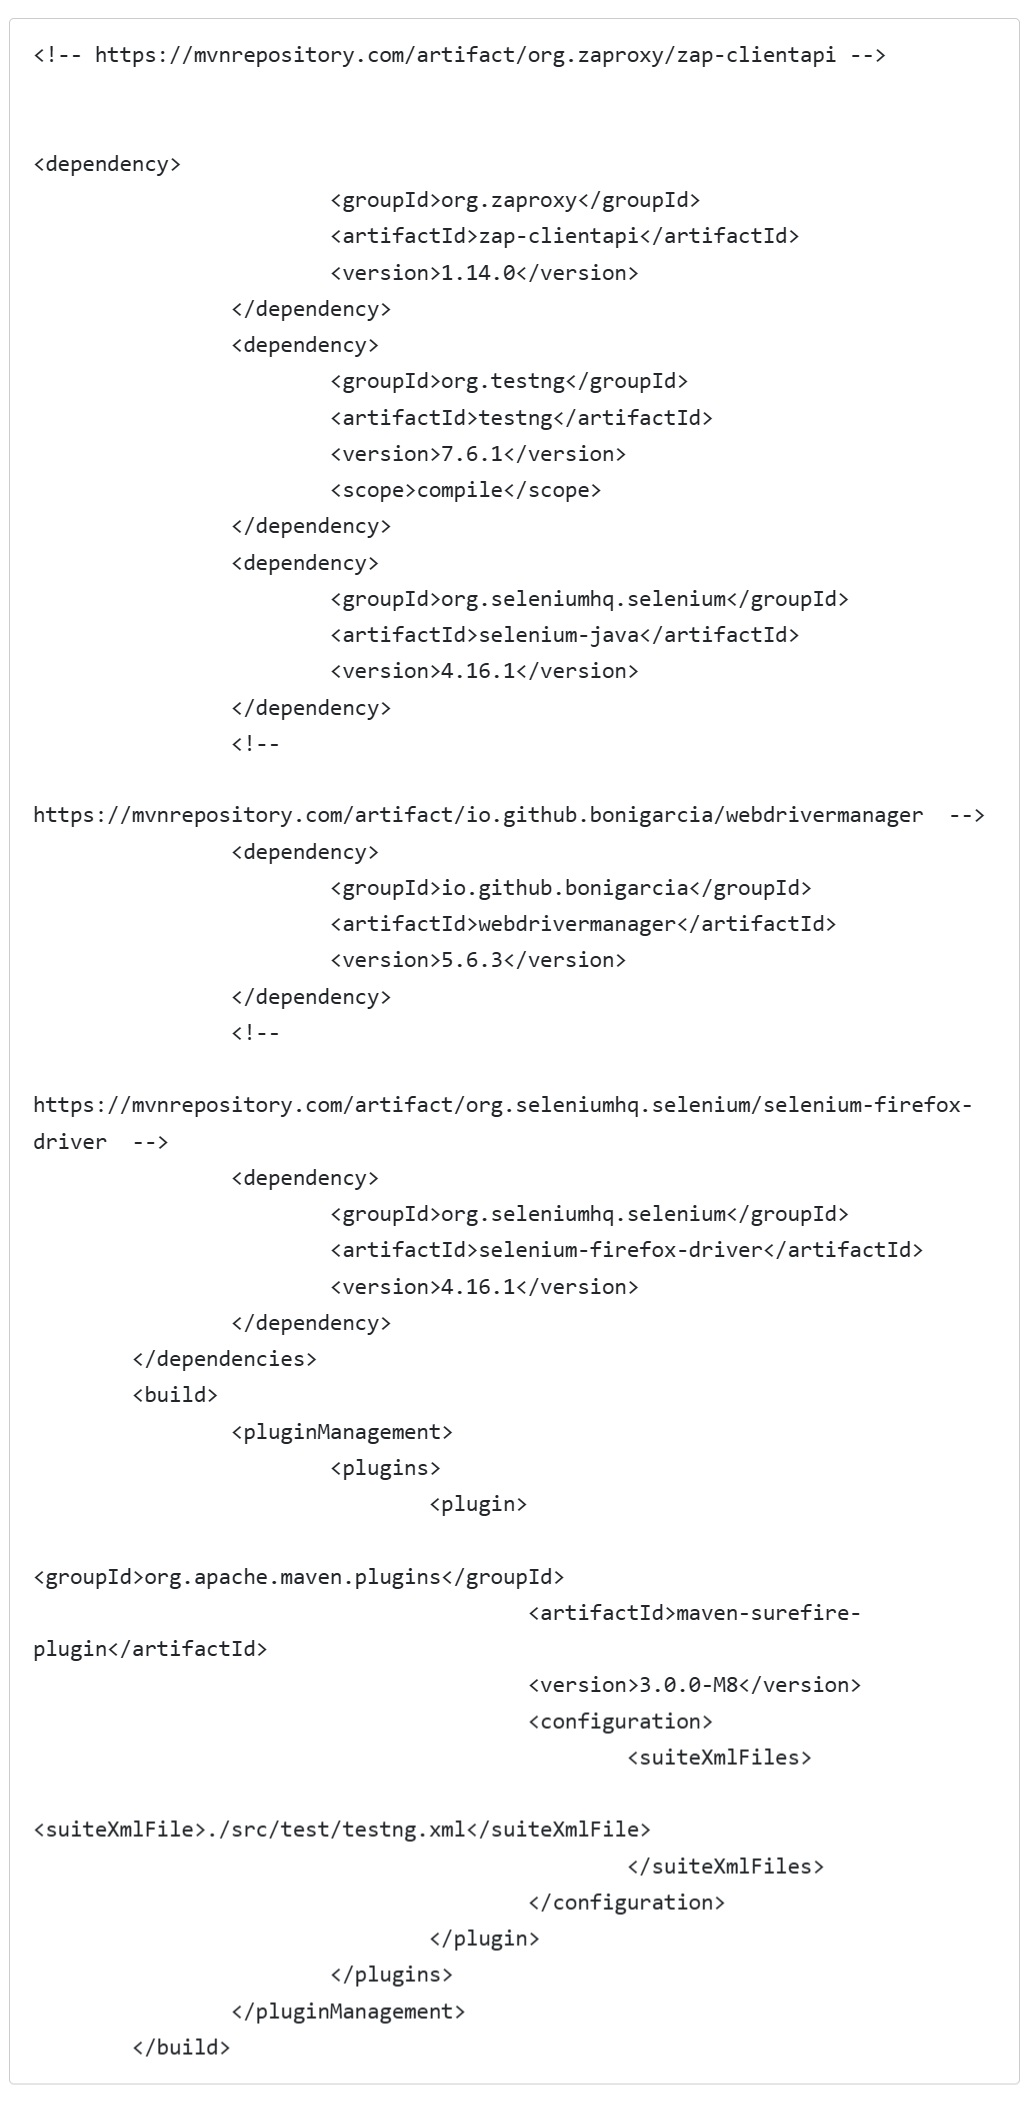
- Add Dependencies:
- Create a Maven Project:
Add the Selenium dependencies to your pom.xml file:
Configuring Selenium to Use ZAP:
Create a ZapUtil class for both passive and active scans:
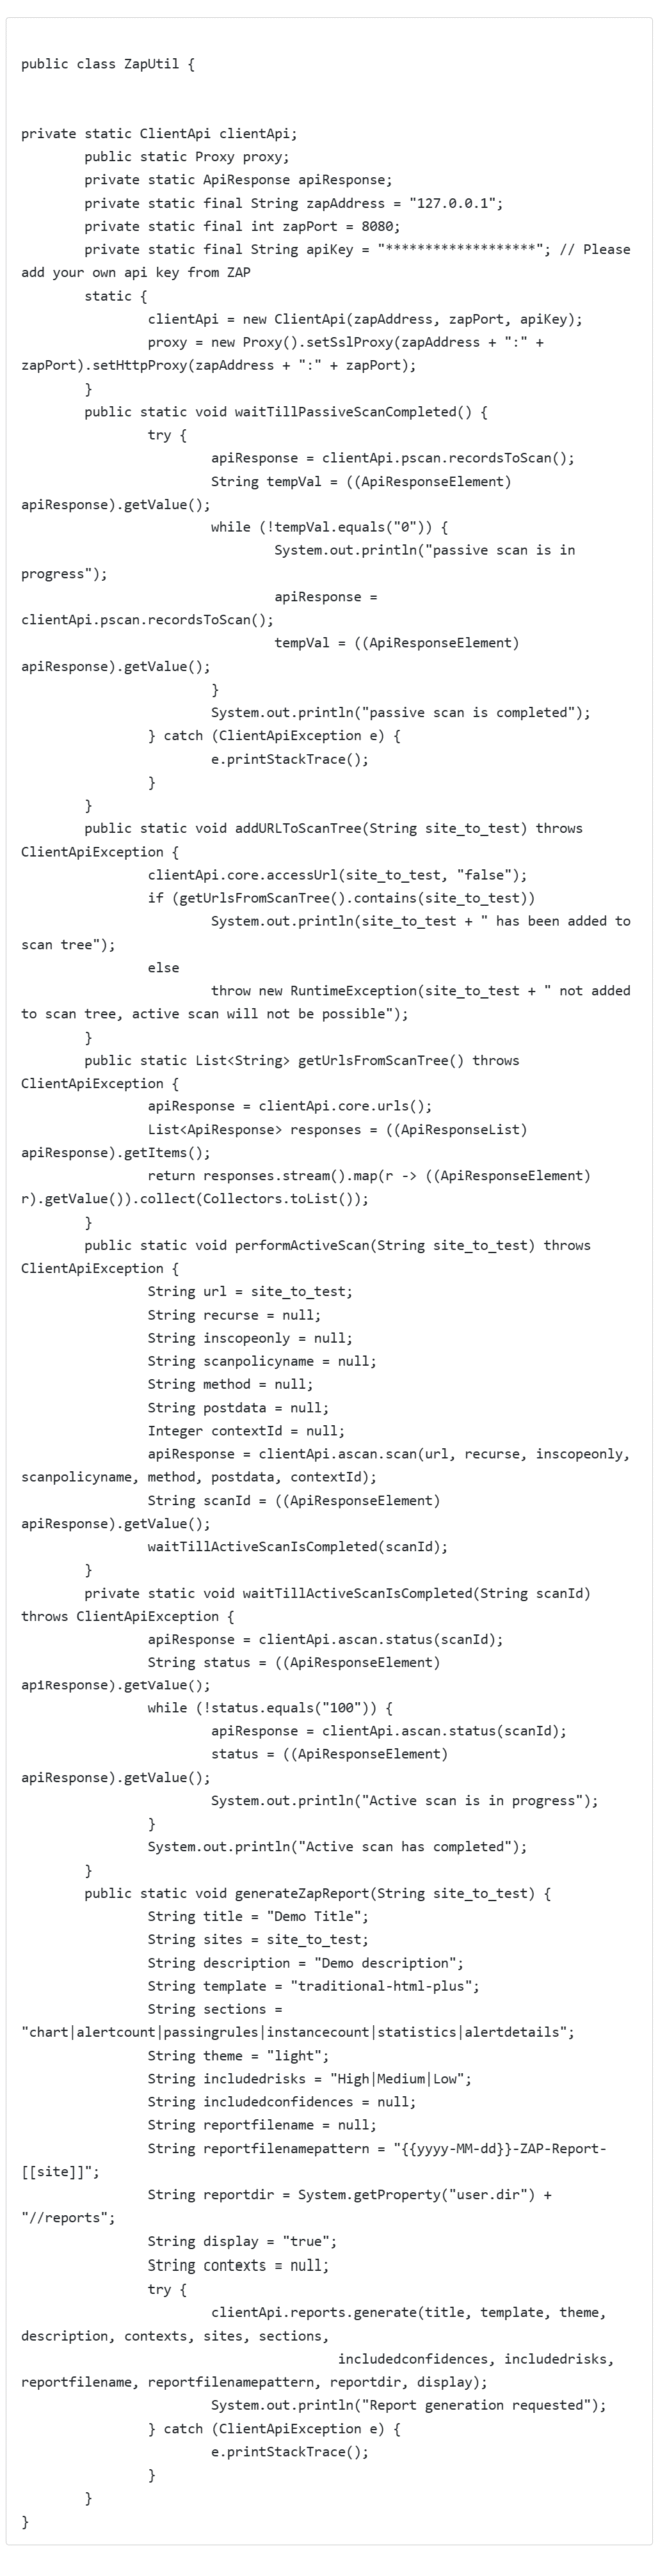
Api key-

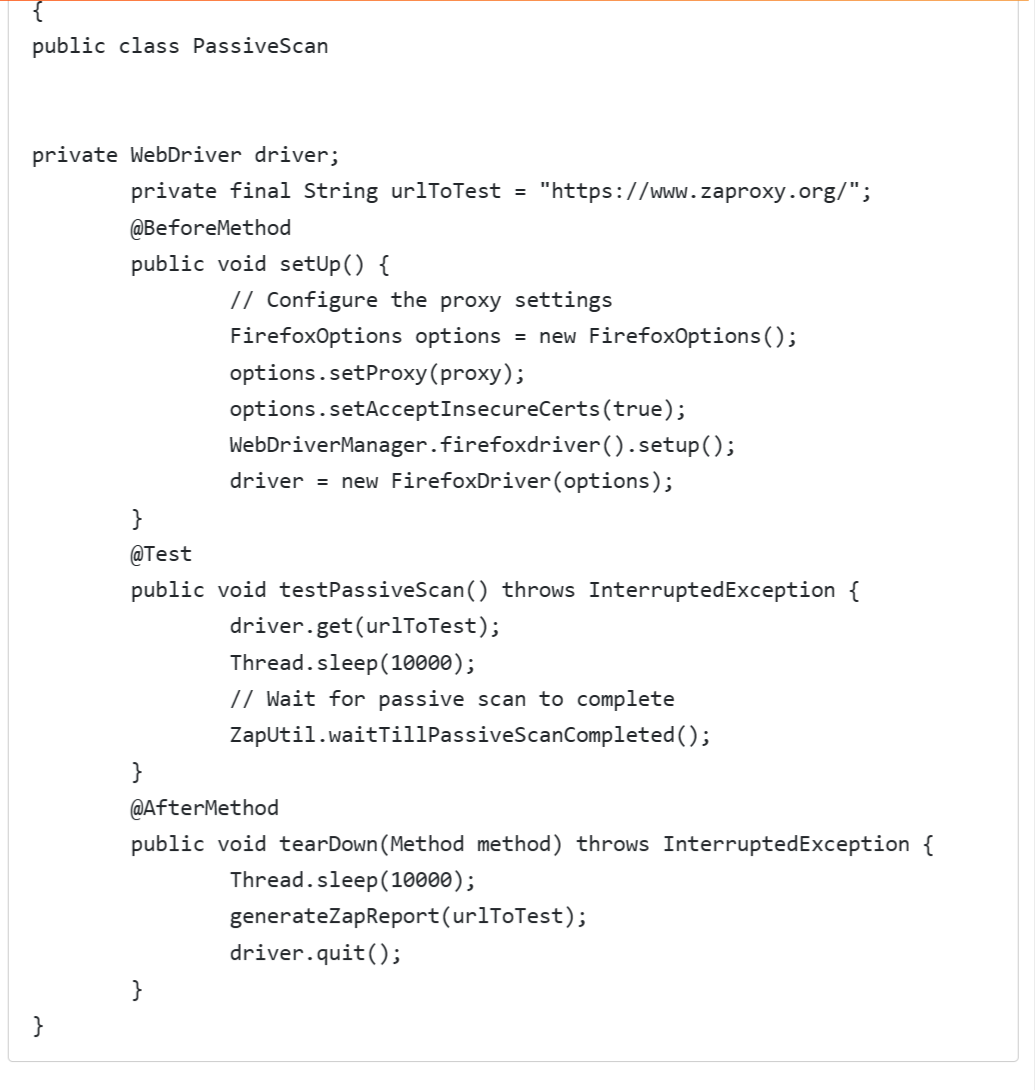
Implementing Passive Scans:
Write Selenium tests to interact with your web application. ZAP will passively scan the HTTP requests and responses generated by these interactions.
- Viewing Passive Scan Results:
- In ZAP, navigate to the “Alerts” tab to view issues detected during the passive scan. This tab provides detailed information about the potential security issues found.
Developing Active Scans with Postman and Selenium Java
Configuring Postman:
- Open Postman and create a new collection for your API tests.
- For each API request, configure the proxy settings to use ZAP (localhost:8080).

Collection download link: Git link
Create environment:

Running Active Scans:
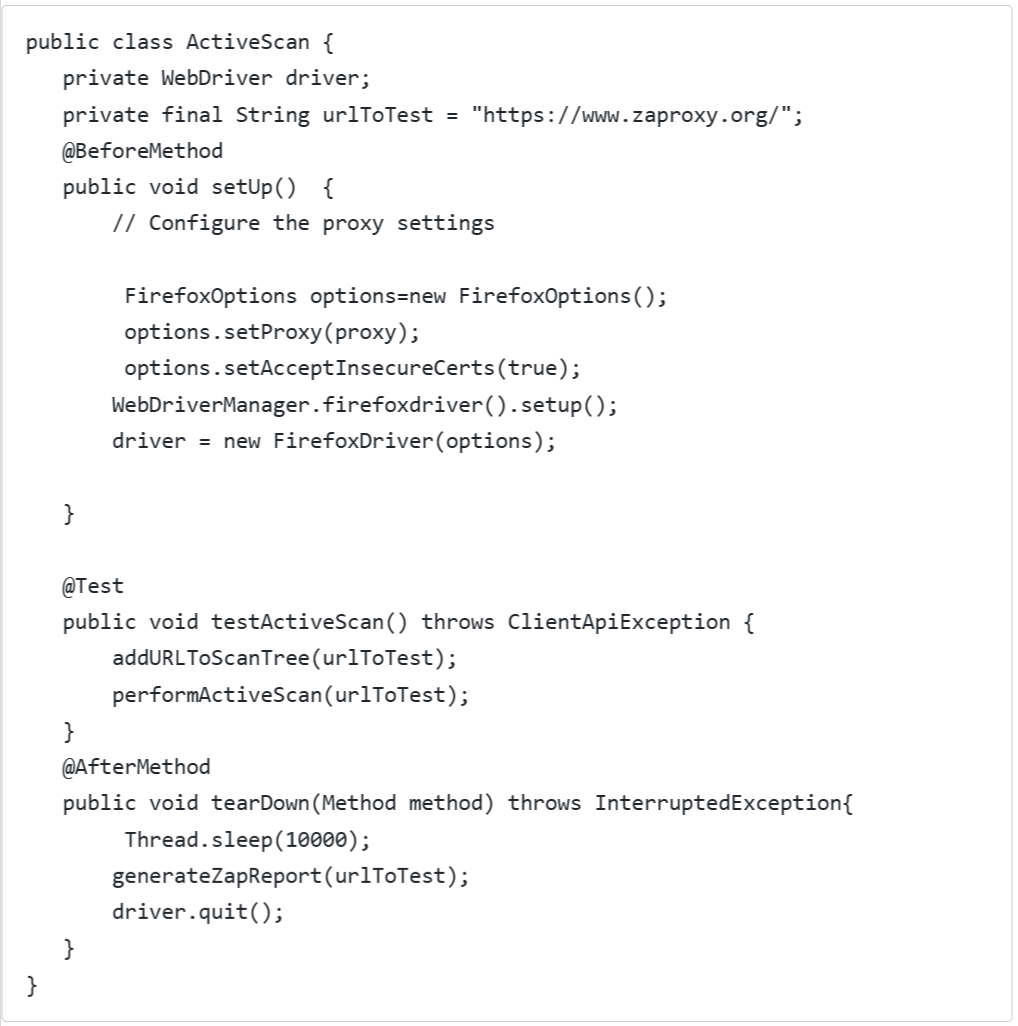
- Set Up Selenium:
Implement Selenium tests for web application interaction:
2. Viewing Active Scan Results:
- Go to the “Alerts” tab to view results. Active scans provide detailed insights into vulnerabilities by sending payloads and analyzing responses.
Understanding Passive and Active Scans
- Passive Scan:
- A passive scan analyzes HTTP requests and responses as they pass through the proxy without altering the traffic. It’s non-intrusive and safe for live systems. Examples of issues detected include missing security headers, outdated software versions, and weak SSL configurations.
- Active Scan:
- An active scan sends payloads to the application to identify vulnerabilities through direct interaction. It’s more intrusive and can affect application performance, so it’s best used in a testing environment. Examples include SQL injection, cross-site scripting (XSS), and file inclusion vulnerabilities.
OWASP ZAP Report
- Generating Reports:
- After completing your scans, you can generate detailed reports from ZAP by navigating to Reports > Generate HTML Report.
- These reports provide a comprehensive view of the security posture of your web application, including all identified vulnerabilities and their details.

Conclusion
OWASP ZAP is a versatile and powerful tool for integrating security testing into your development lifecycle. By leveraging passive and active scans with Selenium, Java and Postman, you can uncover and address security vulnerabilities early, enhancing your web application’s security posture. This guide provides a comprehensive approach to utilizing ZAP effectively, ensuring you can secure your applications against common and advanced threats.
This page was last edited on 21 August 2026, at 5:51 pm

Start a conversation with our team to solve complex challenges and move forward with confidence.